Actions
In Actions, you can create actions that automate your system’s responses to certain events. For example, you can create an action that tells your system to turn the lights on in response to a fire alarm.
The actions available to you vary depending on your system.
System Actions
The System Actions tab enables you to create actions that activate favorites in response to system actions.
System actions are the most common events in a security system, such as arming and disarming.
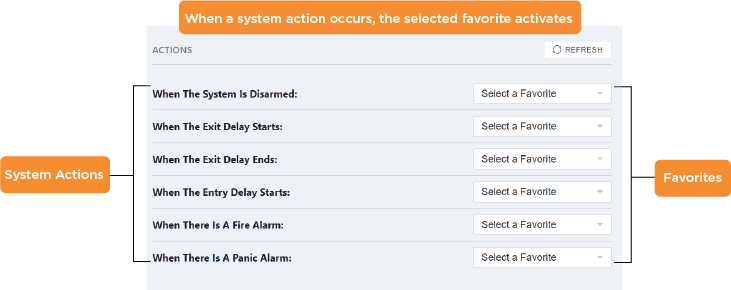
To create an action in System Actions:
Go to Actions.
Tap System Actions in the top menu.
Select a favorite in the drop-down menu next to a system action. The selected favorite will activate when the corresponding system action occurs.
To delete an action, open the drop-down menu next to a system action, then select Select a Favorite. A favorite will no longer activate when the system action occurs.
Edits are saved automatically.
Custom Actions
Custom Actions enable you to automatically activate favorites and control lights, doors, and outputs in response to certain events. Events in custom actions include system actions, card swipe actions, and zone activities.
Note: Card Swipe Actions can only be enabled on XR Series and XT75 Control Panels.
System Actions are the most common events in a security system, such as arming and disarming. Zones are your detection points, like doors, windows, doorbells, smoke detectors and glassbreak detectors.
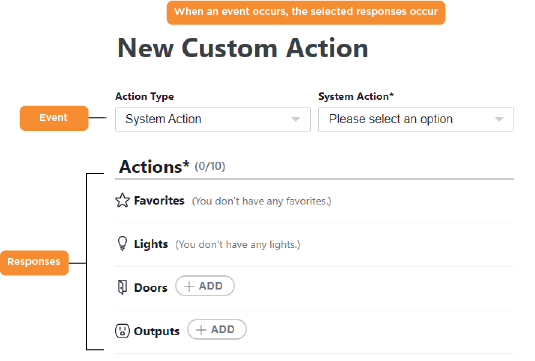
To create a custom action, complete the following steps:
Go to Actions.
Tap Custom Actions in the top menu.
Select the
 Plus icon.
Enter a name for the Custom Action.
Select an Action Type in the drop-down menu: Zone Action, System Action, or Card Swipe Action.
Select a system action if you selected System Actions. Skip to step 9.
For Zone Actions, refer to the following steps:
In Zone, select the zone(s) you want the action to apply to.
If necessary, select a Zone State and an Area State.
Zone State—The zone state determines the type of zone activity required to happen before the system responds.
Area State—The system will respond to zone activity only if the area where the zone is located is in the state you select.
For Card Swipe Actions, refer to the following steps:
In Swipe Action, select Swipe Twice or Swipe Three Times.
Note: Swipe Three Times to arm is only available for XR Series panels.
Select which door(s) and user(s) you want the action to apply to.
Note: When you Swipe Twice or Swipe Three Times to arm for XR Series panels, zones that may not be in a normal condition are armed based on what is programmed for Bad Zones in Area Information.
Add Favorites. The added favorites activate when an event occurs.
Add and configure lights, doors, and outputs. Refer to Configure Device Responses for more information.
If desired, enter the duration and delay time:
Duration—The length of time the lights, doors, and outputs stay in their response conditions. For example, the porch light stays on for five minutes after the doorbell is rung. Duration time does not apply to favorites.
Delay—The length of time the system waits to respond to an event. For example, the light turns off after the door has been closed for one minute.
Choose a schedule (optional). The system responds to events only during the days specified in the schedule. If you choose Custom Days, check the squares next to the days you want to include in the schedule.
Set the Start Time and End Time. The system responds to events only if they occur within the specified start and end time.
Configure Device Responses
When you create a custom action, you configure how lights, doors, and outputs respond to an event. For example, you can configure a light to turn on when the specified event occurs.
Lights
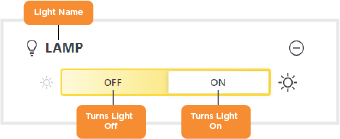
To turn the light on, tap ON. Lights with dimming capabilities will turn on to their maximum brightness.
To turn the light off, tap OFF.
To remove the light from the custom action, tap the ![]() Remove icon in the light’s tile.
Remove icon in the light’s tile.
Doors
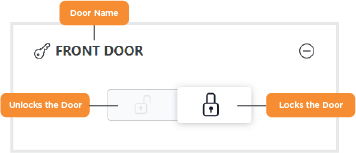
To unlock the door, tap the ![]() Unlock icon.
Unlock icon.
To lock the door, tap the ![]() Lock icon.
Lock icon.
To remove the door from the custom action, tap the ![]() Remove icon in the door’s tile.
Remove icon in the door’s tile.
Doors in custom actions include Z-Wave deadbolts and garage doors. If you add an access control door to a custom action, the unlock and lock icons will be greyed out and the door will not automatically lock or unlock in response to events.
Outputs
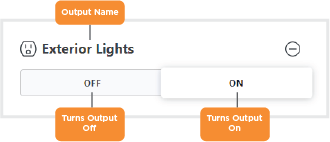
To turn the output on, tap ON.
To turn the output off, tap OFF.
To remove the output from the custom action, tap the ![]() Remove icon in the output’s tile.
Remove icon in the output’s tile.
Video Actions
Video actions enable you to automatically record video in response to certain events, including:
Event Type | Description |
Alarm | The system went into alarm or an alarm was canceled. |
Armed | One or more areas were armed or failed to arm. |
Disarmed | One or more areas were disarmed or failed to disarm. |
Zone Bypassed | A zone was bypassed. |
Door Propped | A door was propped open. |
Access Granted | A person gained access to an area via a keypad or reader. |
Access Denied | A person requested to access an area via a keypad or reader but was denied. |
To create a video action:
Go to Actions.
Tap Video Actions in the top menu.
Select an event type. The area or zone field appears depending on the event type you selected.
Select an area or zone. This determines where the event has to occur before the camera will record automatically.
Select a camera. The camera will automatically record in response when the selected event type occurs in the area or zone that you selected.
Tap Save.
To edit a video action, select the video action, make edits, then tap Save.
To delete a video action, select the video action, then tap Delete.
